Don't Go Nuts! (A-corny joke..haha ok I'll stop)

Wednesday, October 26, 2011
Keeping it in the fall decor spirit (I just spelled out s-p-i-r-i-t in an old cheer from HS to remember the spelling- it is too early!) I have created a super simple and virtually free craft to spruce up any side table or wall for fall! This project was in Better Homes & Gardens (which I just got in the mail with my new subscription!) and I decided to give it a go! Here's what you need:

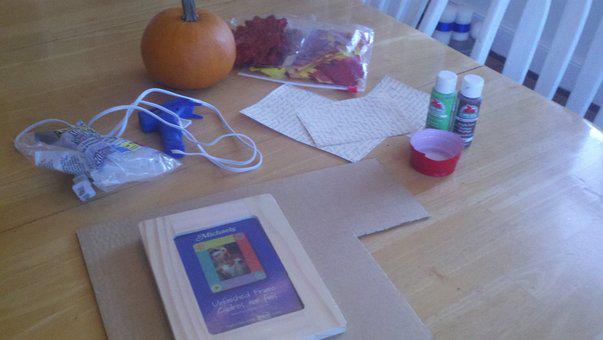
Hot glue, real or fake leaves, a background for frame,
 $1.00 plain frame from Michaels & paint
Next you will need to scout out some Oak trees to gather up some Acorns! -- Seth & I went to a local graveyard (yea its October-keeping it in the spooky realm) which has tons of beautiful oaks and historic graves so it was good for picture taking and finding these HUGE acorn caps:


This was plenty!
Design & put in your backing first, that way
you don't crush any caps or have to wait for it to dry..

I didn't want to leave the frame just plain wood
so I decided to mix a bright green & brown to give me
the sage green I was going for the background


<--Here is the frame painted green. Also, I chose a red oak leaf so that it would stand out & it also matches most of the color scheme in my home. Let your frame dry and then start to glue on your acorn caps however you want
I liked the mixture of light & dark caps


Now you have your finished product! Also below, check out my friend Tiff's version of the fall plain frame transformed! Loved hers! I wanted to put them side by side but she took hers home. We'll have to get her to send a pic of where she placed it when her and her hubby get back from China! As always: Happy Crafting!


Tiffany Peck ladies & gentleman!
  

Simply Stunning! & I love how she put the backing I used
around the frame and used burlap for the actual backing! Miss you Tiff!


Here it is, The Halloween Mantel!

Monday, October 17, 2011
You've asked for it folks and it is definitely trending in blog world so I wanted to get in on the action. My mantel at home is kinda taken over by my man t.v. so luckily Seth donated his! (love him he's a good sport) This particular project was so much fun! I made a trip to the goodwill/local antique shop and scored some old school vintage frames that I love:

The mantel before


Next I went onto http://graphicsfairy.blogspot.com/ to pick out some vintage/creepy clipart to fill the frames! The selection is ridiculous you have to check it out! I bought the rats/plastic pumpkins/black netting and webbing all from Walmart for less than $15 and the skeleton men too! (their garland) The ravens I found at Dollar Tree and the nest/moss like stuff came from the craft store!


This is what his table looked like before i got started....


And BAM! the finished product - just a little spooky... (evil laugh)

Love it! I may have to do this every season now :)


Our mummy man!


Thanks to the graphics fairy, we have poison look-a-likes!

This cute fall candle holder was .69 cents @ goodwill!

These were the orange plastic pumpkins spray painted black

Hey guys!


Hard to see but looks great at night! This entire project was under $30 and so much fun to create! Until next week, Happy Crafting!


Mummy Men & Arachnophobia!

This goes with the above mantel but I wanted to show how simple it was to create! Glass candle votives from the dollar store (check) Almost see-thru ribbon (check) Googly Eyes! (check) Craft glue? (duh) and flameless tealights (check) all from the dollar store to create this mummy man candle holder!
Everything came from the dollar Store!


Look at me glow!
Next I made the Spider-web wreath and weird googly-eyed empty frame. Still with materials from the dollar store I purchased gause-like fabric, a medium sized wreath, black & orange ribbon and one package of webbing with plastic spiders. (I saw this wreath on one of my fav blogs FindingHome and had to re-create)


Just continue wrapping until you have covered the wood, add some of the actual webbing and then place or glue your spiders in! The empty frame (wreath?) came from the dollar store too, painted over it with white -- the pumpkins in the pic I also painted for the mantel. I took wire to dangle the spiders and glued on some googly eyes! haha


So simple. so cute!
"I always feel like, somebody's watching meee!"

Burlap Monogram Framed Art!

Monday, October 10, 2011
Keeping it in the fall spirit, I went to a few thrifty antique spots over the weekend (& lowes for the beloved burlap $9.99) and found some pretty random stuff for this week's project! I found an old framed picture for $4.99, a small picture of finches for $.69 and some ribbon left over from the monogram leaf letter, gold paint and hot glue. (that's all you need folks) I started by taking the backing completely out of the frame and the glass. Then hot glue or staple gun your burlap in place. Next I painted over the finches with gold to semi-match the frame for fall, hung it from the ribbon down the center of the frame and found a fabulous pearl outlined J to complete my obsession with monogramming things! haha-super simple and fall chic! This looks excellent on an easel by the fireplace or hanging anywhere in the home! (I will take a picture of both locations later on this week) Happy Crafting & head over to the featured section/tab for some pieces completed by friends!


I <3 Burlap!


Goodbye vintage finches :(


The finished piece!

Light my Way! DIY lanterns!

Tuesday, October 4, 2011
Let me start by saying, LOVE THESE! They are so simple and so cute, perfect for kids! (and me duh) To start out, get wire $3, hammer/nail, spray paint minis $3 each, soup cans, candles/tealights, and print a face trace or design trace. This project cost less than 10 total depending on what you have already around the house!


Start by peeling the labels from the cans and then cut out and tape your face/design to empty can. Fill can with water and place in freezer (preferably overnight) this is to make the hammering process a breeze when going over the tracing dots. 

Looks done!

Next begin the hammer process, you'll see that it doesn't take much to puncture the can now. (also be sure to make 2 holes on either side of the cans for the wire to go through) When you have gone over the design you want, remove the labels and dry cans thoroughly.


Time to Spray Paint! (I did a pumkin & a bat) so black/orange!


After the cans dry take them inside and cut/feed the wire through the side holes. (length is up to you) Open the tealight/candles (I purchased flameless battery ones bc they are wind/fire resistant, thus safer haha) Place them in your cans and hang where you like! So cute. So simple. Happy Crafting!